
I’ve had to move WordPress sites more times than I would like to imagine! It’s not a painful exercise but can be confusing if you are new to moving WordPress sites . This blog post will give you a step by step guide to migrate your WordPress website design and highlight the main points.
The first time I tried to migrate a WordPress site took me nearly half a day! I’ve learned over the course of a number of WordPress transfers that there’s an easy and effective way to do so. Today, I can transfer WordPress from one server to another, change the domain WordPress was installed under, fix the inevitable broken links and images, and have the site fully functional within just a couple of hours.
Before undertaking this endeavor, you should make sure that your new hosting arrangements are in place. Create an empty database at that location if necessary, and ensure that you have FTP access to the site’s final destination. For the sake of this tutorial I’m going to assume that you understand what this means and how to go about achieving it – if not, you should start by investigating your new hosting provider’s documentation in order to get up to speed.
The first thing I do is connect to the FTP server which provides access to the files for the existing WordPress installation. In the case of a site I’ve developed locally and need to deploy I obviously have all the files already. Getting an entire site is time consuming and, with any decent FTP client, it’s automated, so I make this step one. Just connect via FTP and sync a directory on your local disk to the document root which contains your live WordPress install. Now, with files a-transferrin’, we can move on to other steps.
The easiest tool to use here is going to be phpMyAdmin. Any hosting provider worth their salt is going to offer this to their users. Follow these steps to get your existing database exported:
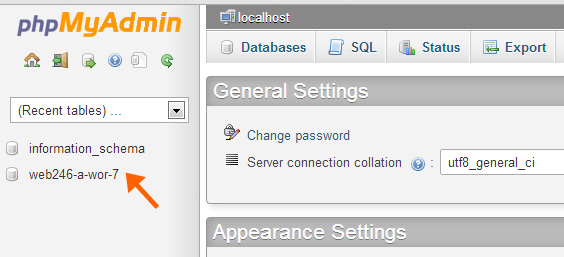
1. Connect to the instance of phpMyAdmin which provides access to the database for your current site. Enter your credentials to log in to the management interface.
2. Select the database for your existing WordPress installation from the list on the left.
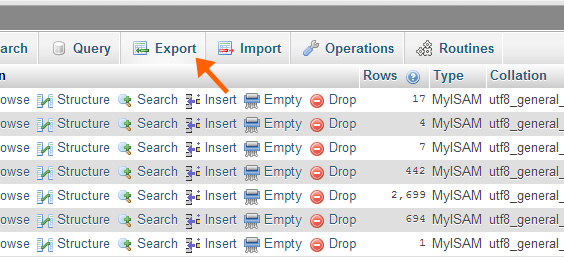
3. Click ‘Export’ at the top of the window.
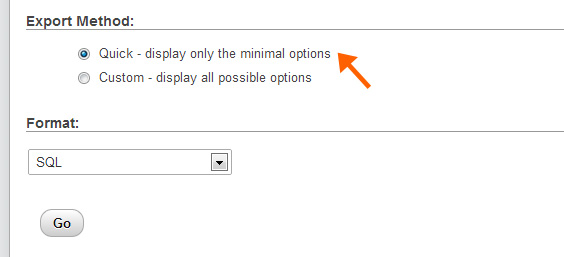
4. Ensure that the radio button for the ‘Quick’ export method is selected. Click the ‘Go’ button to download a .sql file containing a dump of your current database table structure along with all of your existing data.
Now you have to reverse the export process to populate your new database.
1. Log in to the phpMyAdmin interface for the new database.
2. Select the new database from the list on the left (see above).
3. This time, click the ‘Import’ tab at the top of the window.
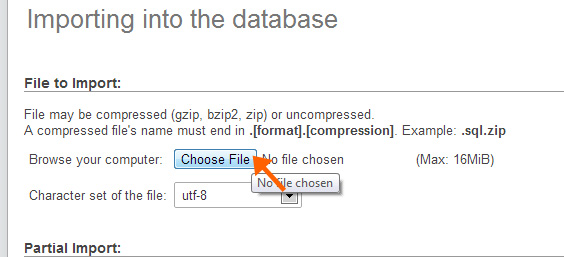
4. Now you’ll have to select the file you just downloaded containing your database dump so that you can upload it here. Click the ‘Choose File’ button and locate the .sql file downloaded during Step 2, above.
5. All that’s left for this step is to click the ‘Go’ button to import your data.
There are two primary fields which need to be modified in order for your migrated WordPress installation to even function.
1. Rather than browsing the data in the wp_options table, let’s just click the ‘SQL’ tab up at the top and send the Database Server Ninja Assassin Monkey Troop off to do our dirty work:
UPDATE wp_options SET option_value = ‘https://www.carocreative.uk’ WHERE option_name IN (‘siteurl’, ‘home’)
Insert that SQL query in the giant ‘Run SQL query/queries on database…’ field and change thehttps://www.carocreative.uk to reflect the root level of the site you’re transferring to (so, if you’re moving WordPress to www.newdomain.com/bar make sure that the /bar is appended here).
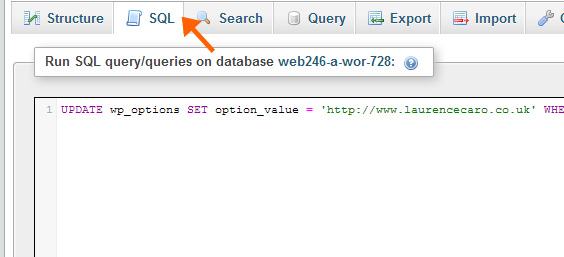
2. Click ‘Go’ to execute the query. You should see a green message box saying that two rows were changed.
3. Sometime you may have to go about fixing broken image links in WordPress posts when transferring domains. Try the below string to resolve these issues:
UPDATE wp_posts SET post_content=(REPLACE (post_content, ‘{old url}’,'{new url}’))
You’re already right where you need to be. Just paste this query over the last and modify the {old url}and {new url} to reflect whatever constitutes reality in your case and then click ‘Go’ again.
(Note: When I say ‘modify them to reflect reality’ I mean that you’ll want them to be the full significant portion of the url which needs changed. So, if you’re moving from http://www.olddomain.com/blog to http://www.newdomain.com you’ll want {old url} to say ‘www.olddomain.com/blog’ and {new url} to say ‘www.newdomain.com’.)
If your files are still downloading at this point just make a cup of tea and relax for a while. Uploading the entire WordPress site is the next logical step here.
1. When you’re ready, connect to the FTP host for the new site.
2. Upload the entire contents of the site to its new home.
3. Edit your /wp-config.php file to include the correct information for your new database:
This has come up a couple of times now, so I’m going to say here in advance that you should try logging into the admin panel in the new location at this point. If you get in without any problems, go to Settings > Permalinks and click ‘Update Permalinks’ to make sure WordPress updates the .htaccess file.
That’s about it!
Naturally, you’re going to want to verify that your site is working correctly before moving on with life. The only variables we didn’t address here are plugins and templates. The primary offenders I’ve found are plugin authors who have elected to store literal URLs for files in the Media Library instead of using get_bloginfo(‘wpurl’) for the URL base. If you’re such a plugin author, fix your code please.
Image courtesy – doug88888 on Flickr
